A sword hanging crookedly on a bare wall, or worse, propped in a corner collecting dust, does no justice to the craftsmanship behind it. Whether you own a handmade Damascus battle blade, a medieval replica, or a prized collector's piece, how you display it matters as much as the sword itself. This guide walks you through a complete step by step sword display process, covering everything from picking the right mount to keeping your blade in showroom condition for years. If you've been guessing your way through it, that stops here.
Table of Contents
- Key takeaways
- Step by step sword display: gathering your materials
- Mounting swords on walls and freestanding displays
- Maintaining and cleaning swords while on display
- Troubleshooting display problems and enhancing presentation
- My honest take after years of collecting
- Find your next display piece at Topswords
- FAQ
Key takeaways
| Point | Details |
|---|---|
| Plan before you drill | Map out your wall layout and locate studs before installing any mounts to avoid costly mistakes. |
| Match mount to sword weight | Always use mounts rated for your sword's actual weight, especially for heavy blades like two-handers. |
| Clean gently and regularly | Use microfiber cloths and distilled water to maintain blades without stripping their finish or patina. |
| Control humidity at all times | Store and display swords in cool, dry conditions to prevent rust and long-term blade deterioration. |
| Lighting transforms a display | Directional lighting highlights blade details and craftsmanship in ways that ambient room light never will. |
Step by step sword display: gathering your materials
Before you touch a wall or pick up a drill, you need the right gear. Skipping this step is where most DIY sword display projects go sideways. Knowing what you need upfront saves you multiple hardware store trips and prevents mounting damage you cannot easily undo.
What you'll need
| Item | Purpose |
|---|---|
| Wall mount or display rack | Holds the sword securely against the wall or on a freestanding surface |
| Stud finder | Locates wall studs for secure anchor points |
| Drill and drill bits | Creates pilot holes for screws and mounts |
| Level | Keeps mounts perfectly horizontal |
| Measuring tape and pencil | Plans accurate spacing and alignment |
| Screws and wall anchors | Secures mounts to studs or drywall |
| Microfiber cloths and gloves | Safe handling during installation |
| Soft padding or foam | Protects blade edges where they rest on mounts |
The type of mount you choose depends on your sword's style and weight. Wall hooks are the most common option for katanas and lighter display swords. For heavier blades, purpose-built wall plaques or horizontal rack systems distribute weight more evenly. Display stands work well when wall space is limited or you want a freestanding presentation on a shelf or table.
- Always wear cut-resistant or leather gloves when handling swords during setup
- Check that every mount is rated for the weight of your specific blade
- Decorative sword replicas often include mounts designed for their weight, so check your product packaging first
- Keep blades sheathed or wrapped during the measuring and drilling phases
Pro Tip: Buy foam pipe insulation from any hardware store and cut it to length. Wrap it around metal hooks to protect your blade's edge and finish where it makes contact with the mount.
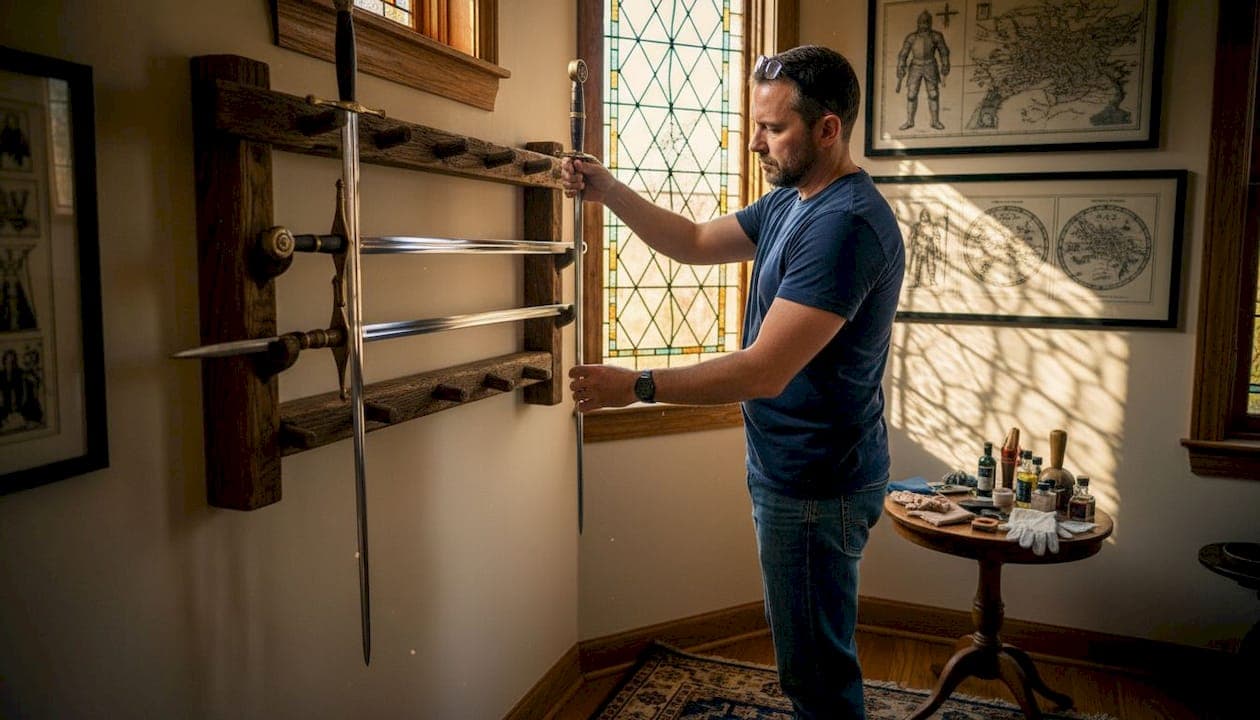
Mounting swords on walls and freestanding displays
This is where the actual display sword mounting steps happen. Follow each stage carefully, and you'll end up with a secure, level, and visually impressive result.
-
Find and mark your studs. Use a stud finder to locate wall studs in your target area. Mark them lightly in pencil. Mounting directly into studs is always the most secure option for heavy swords. If a stud isn't where you need it, use heavy-duty wall anchors rated for at least twice your sword's weight.
-
Plan your layout on paper first. Measure your sword's length and map its position on the wall before drilling anything. Planning mount placement on paper first is what separates a clean, balanced arrangement from a patchy one you'll regret. For multiple swords, leave at least 6 inches of clearance between blades.
-
Mark drill points and check level. Hold your mount against the wall at the desired height. Use a level to confirm it's perfectly straight. Mark your drill points with a pencil, not a pen. Pencil marks erase; ink bleeds through paint.
-
Drill pilot holes and install anchors. Drill at a slow speed to avoid cracking drywall or splitting wood. Insert wall anchors where needed, tapping them flush with the wall surface.
-
Secure the mount and test its strength. Drive screws firmly into the studs or anchors. Give the mount a firm tug in every direction before placing any sword on it. If it shifts even slightly, add a second anchor point.
-
Position and seat the sword. Lay the sword carefully onto the mount, with the blade resting in the padded sections and the handle toward the viewer. Step back and check alignment before calling it done.
Pro Tip: For a wall displaying multiple swords, photograph your pencil layout before drilling. If something looks off in the photo, fix it before it becomes a permanent hole.
Comparing the three main display methods

| Method | Best for | Space needed | Portability |
|---|---|---|---|
| Wall mount | Permanent home display | Minimal wall space | Not portable |
| Freestanding rack | Events, rentals, flexible setups | Floor space required | Highly portable |
| Display case | Antique or fragile swords | Moderate shelf space | Low portability |
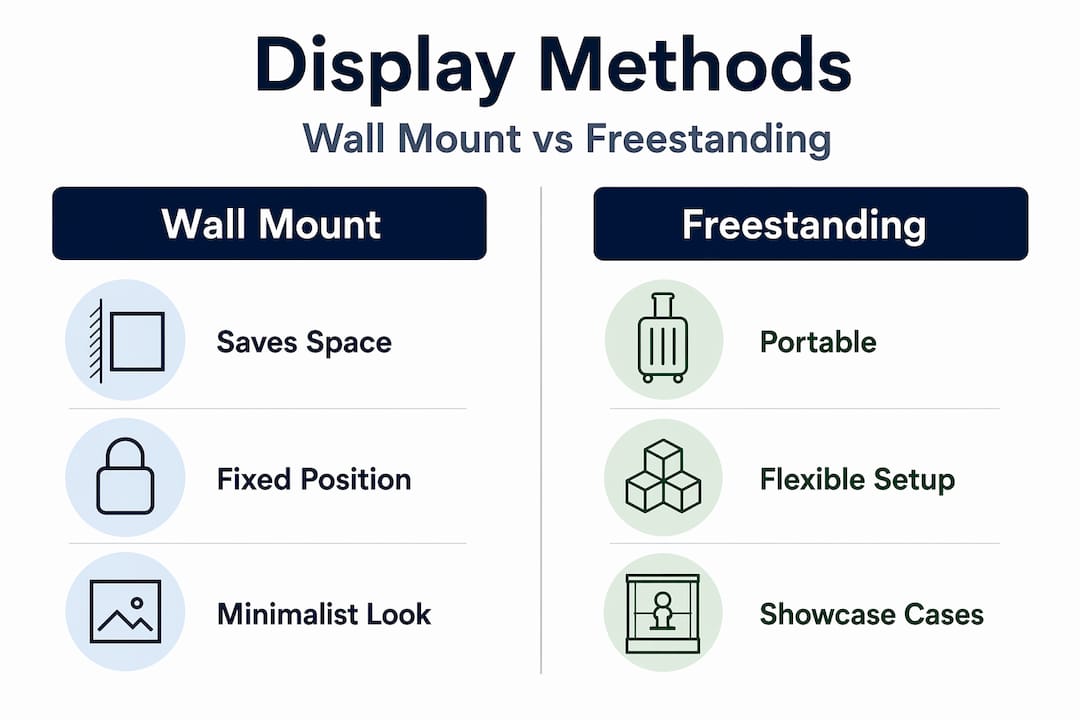
Different display methods each carry tradeoffs. Wall mounts save floor space but commit you to fixed positions. Freestanding racks work well for events or if you rearrange frequently. Cases protect fragile or antique pieces but reduce the visual drama of an open display.
Maintaining and cleaning swords while on display
Mounting your sword is only half the job. A blade sitting on an open wall mount is constantly exposed to dust, humidity, and ambient moisture. Without a regular cleaning and maintenance routine, even a high-quality display sword will begin to show surface rust or a dull, grimy finish within months.
A simple cleaning schedule makes the difference:
- Every two weeks: Wipe the blade lightly with a dry microfiber cloth to remove dust
- Monthly: Use a cotton bud dampened with distilled water to clean around the guard and handle fittings
- Every three months: Apply a thin coat of blade oil or camellia oil to carbon steel swords to prevent oxidation
- Annually: Inspect all mount hardware for loosening; re-tighten or replace if necessary
When you're working through a cleaning swords guide routine, the golden rule is gentle over aggressive. Cleaning antique swords requires soft microfiber cloths, cotton buds, and distilled water. Avoid abrasive materials, bleach, and tap water. Tap water carries minerals that leave spots and can accelerate rusting on exposed steel.
Pro Tip: Never spray any liquid directly onto a mounted sword. Apply oil or cleaning solution to a cloth first, then wipe the blade. This keeps moisture away from screw holes in the guard and prevents seeping into wooden handles.
"Display or store swords in a cool, dry place away from moisture." Humidity is a blade's worst long-term enemy. Proper humidity control is the single most underrated factor in long-term sword preservation.
Avoid displaying swords in bathrooms, kitchens, or near exterior walls where temperature swings cause condensation. A room-level dehumidifier does more for a sword collection than any specialty polish.
Troubleshooting display problems and enhancing presentation
Even well-planned displays run into problems. Here's how to address the most common ones and push your presentation from basic to genuinely impressive.
When a mount feels unstable after installation, don't add more screws to the same drywall location. The drywall is likely compromised. Patch it, relocate the mount two inches in any direction to hit fresh material, and start over. This is a common issue with heavier medieval replicas and two-handed swords.
When you're working with limited wall space, think vertically. A vertical arrangement of three swords stacked at slight angles takes up roughly the same horizontal space as a single horizontal mount. Diagonal positioning creates visual movement and reads as intentional design, not a workaround.
Lighting transforms everything. Directional spotlights accentuate the ripple pattern on Damascus steel, the grain in a wooden handle, and the edge geometry of a well-forged blade. A simple plug-in picture light mounted above your display does more for presentation than any decorative frame or background.
For thematic arrangements, group by era, origin, or style. Three medieval European swords in a triangular formation with a matching period-style shield as a backdrop creates a cohesive scene. Fantasy and gaming replicas look best grouped with props or artwork from the same universe.
When it comes to antique swords, be more conservative. Valuable antiques with original patina should go in closed cases with UV-protective glass. Open wall displays expose them to light degradation and fingerprints from curious guests. For those pieces, protection beats presentation. Most replica and modern display swords are legal to own and display, but always confirm your local regulations for any piece that could be classified as a functional weapon.
My honest take after years of collecting
I've helped set up sword displays ranging from single-piece wall hangings to full event installations with thirty or more blades. The biggest mistake I see consistently is people treating the mount as an afterthought. They buy a beautiful sword, then grab whatever hooks are on sale and wonder why the whole thing looks amateurish.
In my experience, the display should be planned before the sword is even purchased. Think about where it will live, what it will be mounted on, and how it will be lit. A sword designed for wall display, like pieces that come with a dedicated wall display plaque, will always look more intentional than a sword retrofitted to a generic hook.
The other thing I've learned is that step by step sword restoration and cleaning habits are more valuable than any product. Collectors who take five minutes every two weeks to wipe and inspect their blades never end up with rust problems. Those who clean once a year deal with pitting and staining that sometimes can't be reversed.
My actual recommendation: start with one sword displayed perfectly rather than six displayed hastily. A single, well-lit, properly mounted blade at the right height makes a stronger impression than a crowded wall of neglected pieces. Build from there.
— Top
Find your next display piece at Topswords

If you're ready to add something worth displaying, Topswords carries a curated range of handcrafted swords built specifically for collectors. From a custom Damascus steel sword with a genuine leather sheath to a handmade stainless claymore with classic proportions, every piece is built with the kind of detail that rewards a proper display setup. Topswords also offers swords that come with dedicated wall mounts and display plaques, so your setup starts right out of the box. Browse the full collection at Topswords and find the piece that fits your wall and your collection.
FAQ
What is the easiest step by step sword display method?
Wall hooks are the simplest starting point for most swords. Mark your studs, drill pilot holes, install padded hooks, and seat the blade. The whole process takes under an hour for a single sword.
How do I stop my mounted sword from rusting?
Keep the display area dry and away from humidity, wipe the blade with a microfiber cloth every two weeks, and apply a thin coat of blade oil to carbon steel every three months.
Can I display a replica sword on drywall without studs?
Yes, using heavy-duty wall anchors rated for your sword's weight. However, mounting directly into studs is always more secure, especially for larger, heavier blades.
How often should I clean a displayed sword?
Light dusting every two weeks and a more thorough cleaning monthly is enough for most display swords. Antique pieces with original finishes need extra care and gentler methods.
Do I need special lighting for a sword display?
You don't need it, but directional spotlights or picture lights dramatically improve how the blade's details read from across the room. Even a single focused light source makes a visible difference.